0

nintendo mushroom card

I was looking through photos of old projects the other day (now that I have access to the images on my computer again) and I saw this cute little card I made for my brother-in-law last year.

I rarely make cards, but enjoy it when I do – I suppose I need to make more cards. The problem is, I always want the perfect card for the person, not just any old nice card, which means I would have to custom make each card for each occasion. I should though… they turn out great!

My brother-in-law likes games and things like that, which I know virtually nothing about, so I decided to go old school gaming (by which I mean back to my own childhood). What do you think?

dsc_7506dsc_7517

dsc_7513

-Jamie

3

needle book

So, this is something that I made before moving to Canada. I’ve got a couple of things like that, which I made and brought, and I’ll try to share them over the next couple of weeks. I’m also hoping that our container will be shipped soon, so I have all the other things I’m wanting. It’s annoying not having all my ‘stuff’.

In good news, I’ve got my new sewing machine. It’s amazing and I can’t wait to tell you all about it, but I’m going to wait til I’ve had a bit more of a play with it, then I’ll write a proper review.

Anyways, this is a little needle book that I made a while ago. I was tired having to pick through a box of needles – my fingers wanted not to be pricked and poked all the time. So I found a little needle book online and made this one:

I’m going to try some quilting in the next little while, so I thought this was a good chance to try putting a few squares together. I ended up with one inch squares. It was way more effort than something like a needle book should be, but was a fun thing to try.

On the inside, I used felt to make the six ‘pages’ and put circles of cotton on top to hold the needles. I think they are quite cute – I’ve only shown three, as the other three are the same, with 2 of each fabric. There’s a little ‘pocket’ that extends across the front and back – as you can see I’ve got a little sewing kit in the front. I added the ricrac just for fun – thought it looked nice!

And have I showed you these before?

I made a bunch of labels for my sewing projects, and thought this looked cute in the back of the book. The only problem with the labels is that I keep forgetting to put them in. I remember after the project is past the point of adding a label. Oops!

That’s all for now – let me know what you think!

-Jamie

10

hello? it’s me…

I was going to jump into a whole Adele thing, but that’s as far as I’m going.

Is anyone still there? It’s been a year – a whole year, but I’m hoping to start the blog back up again.

Let me explain: last year, I was working as a teacher in the UK. It seemed that every year I worked there, my workload got heavier. As a teacher, you always expect that your first year is going to be crazy, but that then it will get easier from there. But last year, I was averaging 60 hours a week, and regularly worked up to 70. Stupid! And unfortunately, it meant that I had to ditch other things in life. So the blog – and most of the fun crafting that went along with it – got ditched for awhile.

But, here’s the thing: I’ve moved back to Canada! And I’m starting my blog back up again, assuming you’re still wanting to hear from me. I’m finally feeling settled enough to get back to my crafting, so yeah, here I am. 

I have got some things that I made last year to show you – I’ve had a new nephew since I blogged last, so as you can imagine, I managed to get the sewing machine out a few times. And I sewed a new dress that’s actually wearable. How exciting is that?


Anyway, that’s all for now – please say hi if you’re still there!
-Jamie

2

cute little camera case

This is a little project I finished a little while back. I wanted a really small, portable camera case, so I made this. It turned out all right, but there are definitely things that I would do differently if I were to make one again. It is really cute though, and provides just enough protection for a light trip.

DSC_6704
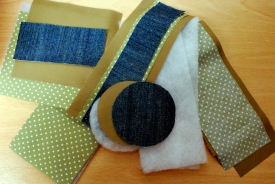
Lots of cutting out of pieces – I used a template for the circles and a quilting ruler for the rest of the pieces. The only tricky bit was when I had to figure out how much denim (reusing the hubby’s old jeans – score) and other fabric to complete a piece, considering the seam allowance.

DSC_6712
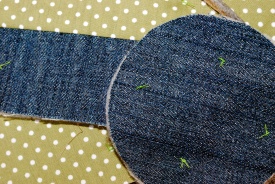
Lots of tacking together of the pieces with the batting in between. I used this horrible green thread that I had from another project, but found it wasn’t different enough from the green polka dot material. Wish I had some red thread, but I don’t really like red, so it’s not likely…

DSC_6735Sewing the end on this tube was one of the hardest parts of the project – you can see where I’ve tried to go over and over it, trying to catch all the layers. There may still be a small gap on the front – oops!!


DSC_6747
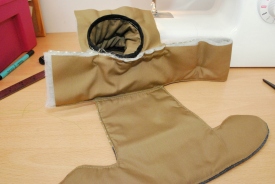
The gap between pieces was so small that it was really tricky to stitch it up. I made it, but there was a lot of blood, sweat and tears involved (and possibly a few choice words).


DSC_6752
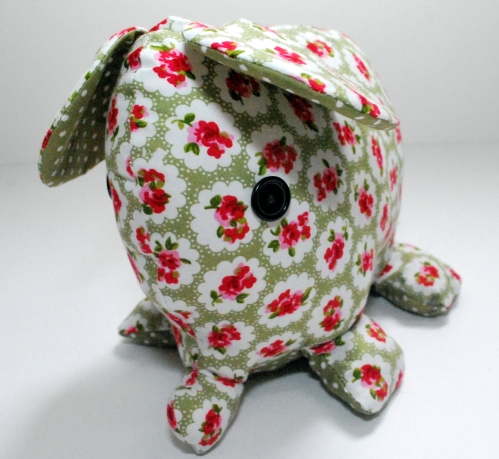
But… the end result is pretty cute, I think! The only problem is that I can’t take a photo of my lovely camera case with my camera in it. And it looks way better when the camera is in! IRONY!!DSC_6770

In the end, I’m okay with it – mostly glad it’s done, not sure I’d make one again, unless for good money! What do you think?

-Jamie

3

an elephant

I love elephants! They are by far my favourite animal. A couple of years ago, while she was visiting, my grandma bought me a card with this photo on it, and I love the card! (she didn’t even know that they were my fave!!)

elephant_1772075i

I love elephants.

I hate the door to our bedroom. It has a really stupid latch on it – don’t get me wrong, I like our house, but this latch is annoying:

Latch

(That’s not actually our door, btw)

It doesn’t properly hold the door shut – so in the winter, when it’s cold and you want the door to be closed, it kind of rattles and sometimes even pops open – a bit scary when you’ve just been watching an episode of something murder-y… And in the summer, when you want it open, it swings and creaks and sometimes closes and opens itself. Creepy!

So the hubby suggested that, with my ‘vast’ sewing knowledge, I make a door stop. And I did. I wanted one that was pretty and that I didn’t mind constandly sitting on the floor, so I made an elephant. I used a stuffed animal pattern as a starting point, which unfortunately means that my elephant is constantly doing the splits. But that’s okay. Its cute. And it has a heart on it’s butt… just because!

DSC_6756DSC_6761DSC_6765

So there you go – the results of my hating the door and loving elephants!

And, I’ve learned a thing or two, so the next one would look even better!

-Jamie

2

this could be the laziest thing you’ve heard of…

Okay, so I was sewing the other morning and my hair was bothering me. It’s getting really long and I’m between ideas about what to do with it. It was really hot out and long hair is not nice in the heat.

There are two things that one can do in this situation, one reasonable and one ridiculous:

  1. Reasonable – you could walk down one flight of stairs to the bedroom and grab a hair elastic.
  2. Ridiculous – this:

DSC_6728 DSC_6729 DSC_6781

Yup, instead of walking 20 feet, I took ten minutes, 5 inches of elastic and 18 inches of fabric and sewed a scrunchie.

And let me tell you, it made me feel old! See, scrunchies are back in, it seems. I remember when I was a kid and all I wanted was the best scrunchies – I can still tell you that my favourite one was an off white, waffle fabric scrunchie. I loved it.

I don’t feel like I’m old enough to have trends coming around again for another time. But I guess if I’m really honest, it’s not the first time!

-Jamie

4

my crafting area

The title of this post was going to read ‘my messy crafting area’. I really wanted to, but couldn’t figure it out. Might be that I can’t do it…

Anyhow…

As I’m on holidays, I figured that I should get some things around the house (read – things I’ve been ignoring for the past few months) done.

I went through all my clothes and have a couple of big bags for charity – something I’ve been meaning to do for ages, and today we tidied the cupboard under the stairs. It’s where we keep the vacuum and cleaning supplies and stuff, but there’s also pain that our landlords left in there and such. Messy! And I think I got grease on my top – any top tips on getting it out of clothing? Not impressed, but at least it wasn’t a favourite top.

Anyway, the biggest task that I’ve done so far is cleaning the loft (or attic) out. When we moved into this place, I was really excited about the prospect of a crafting room. I have wonderful, huge dreams of a dedicated craft room someday, with custom furniture and the lot! But for now, I was just happy with a room that I could use at least part of for my crafts.

The problem was, I haven’t been doing many crafts upstairs for a long while. So it became a bit of a dumping ground. See, we still have to use the area for storage – camping stuff, luggage, etc. Here’s what it looked like:

Before 1 Before 2 Before 3Not exactly a productive area.

It’s still not amazing, but here’s what I have to work with now:

After 2 After 3After 1 Much better! And the stuff by the stairs is more that we’re getting rid of.

And I’ve already been sewing up there again. Started a new project (again… why do I do this to myself). Realised this evening that I have made a significant measurement error, so I’ve got to re-cut a bunch of pieces – ANNOYING! But I’ll share more soon, and I’ve got lots of pics of my garden to share in the next couple of days.

Still a bit stuck on tomorrow’s photo challenge – who knows what I’ll come up with!

-Jamie


5

why i don’t blog more often

This could be called – why I don’t finish crafts I’ve started…

I am a procrastinator. That is all…

masked procrastinator

Okay, maybe there’s more to it than that! In fact, I know there is!

One of the reasons I can cope with teaching is that I have like to have a million things going on at once. With teaching, it’s not just the standing in front of the class. It’s planning, assessing, teaching, marking, paperwork, counselling (let’s not kid ourselves), mediating, entertaining… Let’s not forget reports. I just finished those!

Realistically, I am exactly the same way with my crafts. I have so many different crafts on the go at any given time that very little gets done. I’m pretty sure that my mom would tell you that I’ve always been that way – more going on than I can cope with.

So I thought for a little fun, I’d round-up my ongoing projects, be it craft or otherwise.

  1. My garden is always ongoing. Right now it counts as something to do because it needs weeding. DESPERATELY!
  2. Seedlings – I have a bunch of plants in seed trays that want to go into larger pots fairly soon. And by soon, I mean yesterday…
  3. My tribal print dress – I love this and can’t wait to wear it. No clue why I’m still taking a break from it. I should start back on it soon!
  4. Tank top – I bought some pretty material for pretty cheap, and thought it would make a pretty, quick top. It wasn’t as quick to make as I’d hoped, so there it sits…
  5. Elephant door stop – I made a cute door stop to prevent a door banging all night. I used an online pattern, and it didn’t turn out as pretty as I had hoped. Realistically, this project is finished. But could I be bothered to photograph it so I can call it really done? Ha!
  6. I finally decided what to do for memories of our travels. I’ve bought lots of things for this, and hope to get it under-way soon, but haven’t started yet.
  7. Since we were married (almost five years ago), I have intended to make a scrapbook of our wedding. I FINALLY started it last night. I suppose then I can hope to finish it before our 25th…  I’ll try to share the pages with you as I finish them!
  8. This necklace. I tried to make it before Christmas, and still love the idea, AND have bought all of the necessary materials, but haven’t bothered fixing it after it flopped!

I’m sure if I looked, I would find even more projects that aren’t completed – my hubby will probably remind me of some! I love crafting, and can’t wait to start more, but hopefully I’ll finish a few of these soon!wpid-superwoman-clipart

In the next few months, I also want to start a quilt and a Christmas tree skirt. Hopefully, I’ll finish a few things so I can get onto these!! 🙂

What have you got on the go at the moment?

-Jamie


8

portable playmat

Firstly, and most importantly, let me say a big happy first birthday to this gorgeous little girl. She’s my niece, and I am so very sad that I can’t be there with her today!

3

For her birthday, I had a little idea. I saw several examples like this on pinterest, and have managed to make a super cute little mat.

DSC_6562

First the fabric. When I saw this, I KNEW it was right. Instantly!

DSC_6573

Cute, isn’t it?

Here’s how it works:

DSC_6564

Throw a few toys into it (that is seriously ALL the toys I had in my house – can you tell we don’t have kids??), then pull the strings and tie. It becomes a bag full of toys.

DSC_6568Bring it along with you to a friend’s house or use at home – just open up and stretch out, then you have a portable play mat, complete with toys!

DSC_6564

Hope you enjoy it, Livvy! Much love from Auntie Jamie!

5

Crafty Box-Bag

DSC_6590I made this box-bag a couple of weeks ago, and have been meaning to share it with you since! Unfortunately, I haven’t been able to, thanks to technology. You see, I had an idea of what I wanted to create, so I looked EVERYWHERE online to find a pattern to make it with, but couldn’t find one anywhere! So I ended up making a pattern myself. And because there wasn’t much in terms of a pattern I thought I’d share a pattern and tutorial! If you do end up making one, please send pics! 🙂
Here are the steps that I took to make my lovely little box-bag:

First I cut out the fabric. I used a heavy cotton (think curtains) for the outside, a thin cotton on the inside, and a thin iron-on interfacing to give it shape.

Then I sewed the outside together (with wrong sides together), and the interfacing and lining together – right side of fabric together, with interfacing on outside.

On both pieces, I measured in 3 inches  from the bottom and side, and sewed across this line to give the bag it’s rectangular bottom.

Then I put the outside into the lining, with right sides together, and sewed around only one of the handles. I turned it so that the outside was on the outside. It was tricky, but I then folded over the edges of the un-sewn handle hole, and sewed it together, then top-stitched around the other to match.

At this stage, the bag didn’t have quite the square edges I was hoping for, so I pinned the corners and ran a stitch all the way down them, which gave the bag a very crisp corner. Nice!

DSC_6561In the end, I’m very please with the box-bag. It turned out EXACTLY like I had imagined and holds sewing and knitting projects perfectly! I may need to make a few more, in fact! Hope you enjoy, and it you’d like to download the pattern, it can be found HERE: Box Bag A4, Box Bag LETTER. My first pattern, so please let me know how it works! Happy sewing!!

DSC_6592


-Jamie